装饰 Decorator
装饰模式是一种结构型设计模式,允许你通过将对象放入包含行为的特殊封装对象中来为原对象绑定新的行为。或者说允许动态地向一个现有的对象添加新的功能同时又不改变其结构,相当于对现有的对象进行了一个包装。所以装饰模式也称“包装器模式”。
为什么要使用?
装饰模式的对象职责:
动态地向一个现有的对象添加新的功能同时又不改变其结构。
对于一些无法通过继承来扩展功能的类或一些难以扩展功能的类,可以使用装饰模式来动态地添加新的功能。
例如,在一个原始的文件类中,文件内容明文保存。现在有部分文件需要让内容加密,就可以使用装饰模式给它添加加解密功能。如果还需要将大文件压缩,可以在加解密外层再添加一个压缩解压缩的装饰器。使其变成一种链式结构:明文 -> 加密 -> 压缩、解压 -> 解密 -> 明文。
装饰模式是一种纵向扩展的模式,能够动态扩展。就像套娃玩具🪆一样,一层套一层,不打开它,你永远不知道是不是最后一层。每个套娃都能打开,这就像一种统一的行为,无论套多少层,它都不会改变。装饰模式也一样,要确保被装饰物的接口 API 的透明性,无论添加多少装饰器都要保证不改变“被装饰物的 API”。
模式结构
部件(Component)声明封装器和被封装对象的公用接口。
具体部件(Concrete Component)类是被封装对象所属的类。它定义了基础行为,但装饰类可以改变这些行为。
基础装饰(Base Decorator)类拥有一个指向被封装对象的引用成员变量。该变量的类型应当被声明为通用部件接口,这样它就可以引用具体的部件和装饰。装饰基类会将所有操作委派给被封装的对象。
具体装饰类(Concrete Decorators)定义了可动态添加到部件的额外行为。具体装饰类会重写装饰基类的方法,并在调用父类方法之前或之后进行额外的行为。
客户端(Client)可以使用多层装饰来封装部件,只要它能使用通用接口与所有对象互动即可。
装饰模式的类图:
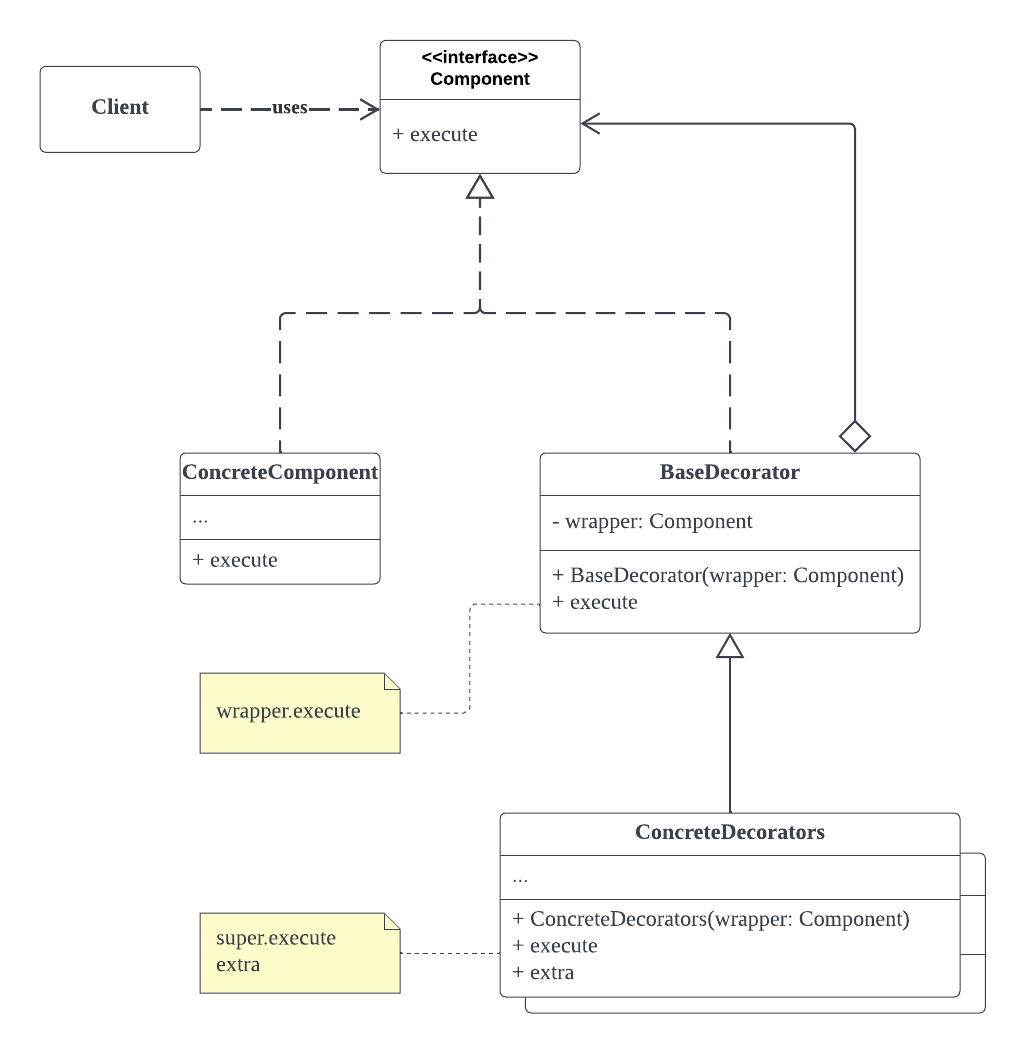
装饰模式让原始类(Concrete Component)和装饰类(Base Decorator)分离开来。
让装饰类基类(Base Decorator)在原始类(Concrete Component)的基础上扩展新功能。
让具体装饰类(Concrete decorators)在装饰类基类(Base Decorator)的基础上扩展新功能。
模式实现
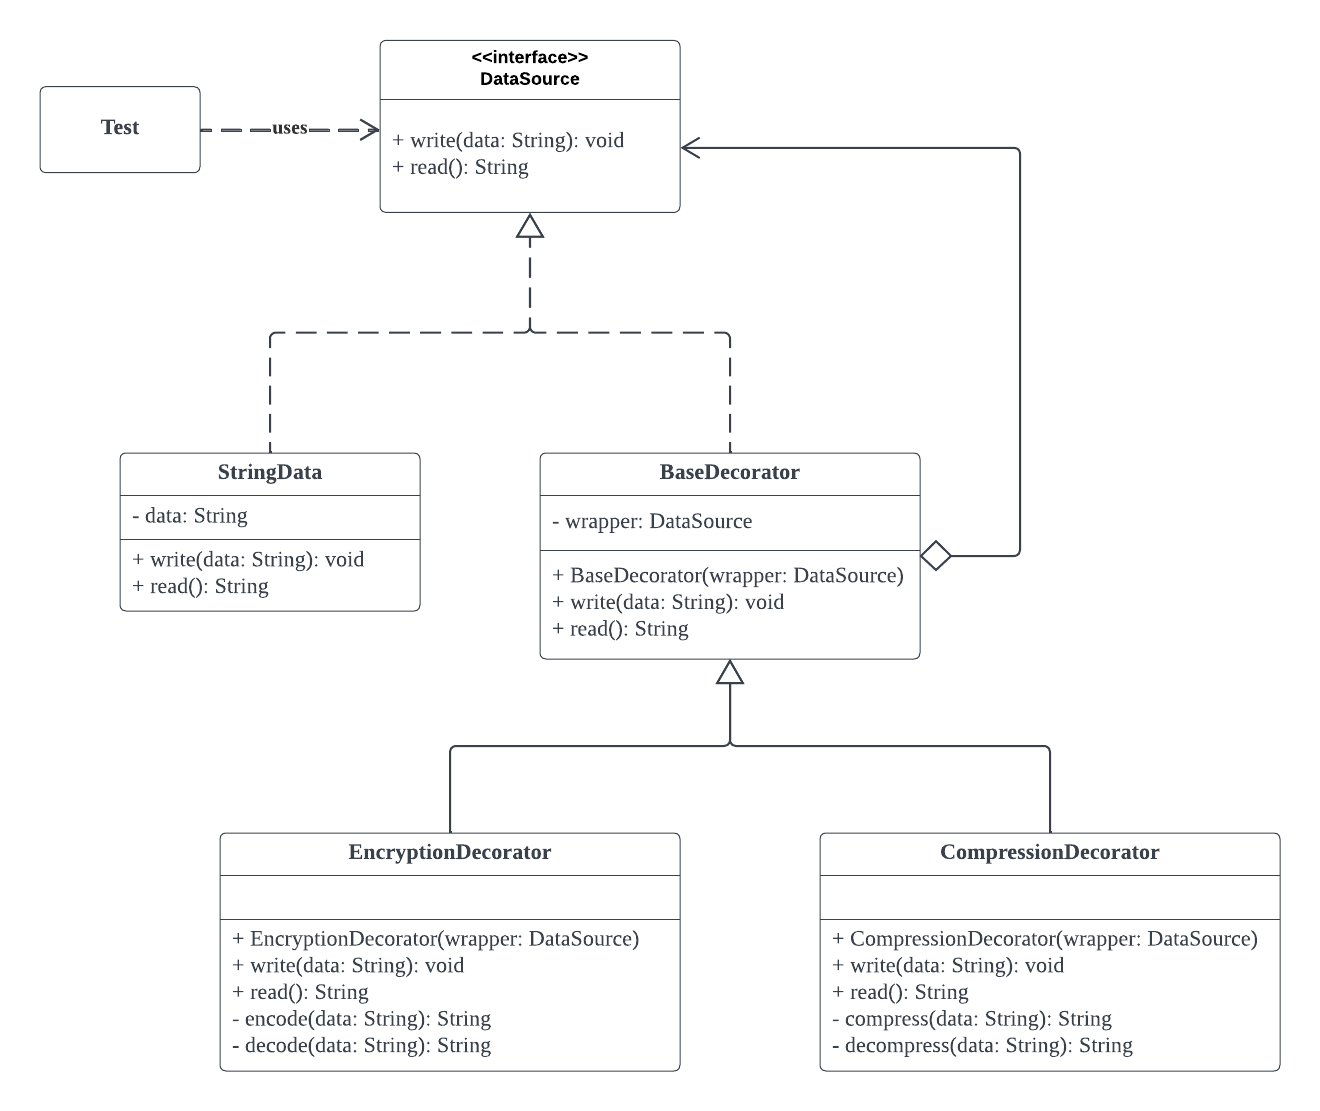
该示例使用装饰器模式为原始数据提供加解密和压缩解压缩的装饰,使原始数据可以使用一种链式结构任意加密压缩或压缩加密。该示例中加解密和压缩解压缩只用字符串标识。
示例程序的类图
代码实现
部件
1
2
3
4
5
6
7
8
9
10
11
12
13
14
15
16
| package example;
public interface DataSource {
void write(String data);
String read();
}
|
具体部件
1
2
3
4
5
6
7
8
9
10
11
12
13
14
15
16
17
18
19
20
21
22
23
24
25
26
27
28
| package example;
public class StringData implements DataSource {
private String data;
@Override
public void write(String data) {
this.data = data;
}
@Override
public String read() {
if (data != null && !"".equals(data)) {
return "\n[储存的字符串]" + data + "\n";
}
return "";
}
}
|
基础装饰
1
2
3
4
5
6
7
8
9
10
11
12
13
14
15
16
17
18
19
20
21
22
23
24
25
26
27
28
29
30
31
32
33
34
| package example;
public class BaseDecorator implements DataSource {
private DataSource wrapper;
public BaseDecorator(DataSource wrapper) {
this.wrapper = wrapper;
}
@Override
public void write(String data) {
if (wrapper != null) {
wrapper.write(data);
}
}
@Override
public String read() {
if (wrapper != null) {
return wrapper.read();
}
return null;
}
}
|
具体装饰类
1
2
3
4
5
6
7
8
9
10
11
12
13
14
15
16
17
18
19
20
21
22
23
24
25
26
27
28
29
30
31
32
33
34
35
36
37
38
39
40
41
42
43
| package example;
public class EncryptionDecorator extends BaseDecorator {
public EncryptionDecorator(DataSource wrapper) {
super(wrapper);
}
@Override
public void write(String data) {
super.write(encode(data));
}
@Override
public String read() {
return decode(super.read());
}
private String encode(String data) {
return "(encode)" + data + "(encode)";
}
private String decode(String data) {
return "\n(decode)" + data + "(decode)\n";
}
}
|
1
2
3
4
5
6
7
8
9
10
11
12
13
14
15
16
17
18
19
20
21
22
23
24
25
26
27
28
29
30
31
32
33
34
35
36
37
38
39
40
41
42
43
44
| package example;
public class CompressionDecorator extends BaseDecorator {
public CompressionDecorator(DataSource wrapper) {
super(wrapper);
}
@Override
public void write(String data) {
super.write(compress(data));
}
@Override
public String read() {
return decompress(super.read());
}
private String compress(String data) {
return "(compress)" + data + "(compress)";
}
private String decompress(String data) {
return "\n(decompress)" + data + "(decompress)\n";
}
}
|
代码测试
1
2
3
4
5
6
7
8
9
10
11
12
13
14
15
16
17
18
19
20
21
22
23
24
25
26
27
28
| import example.*;
public class Test {
public static void main(String[] args) {
String data = "Hello world!";
System.out.println("字符串:" + data);
System.out.println("使用装饰器前:");
DataSource before = new StringData();
before.write(data);
System.out.println("读出的数据为:" + before.read());
System.out.println("\n--------------------- 分割线 ---------------------\n");
System.out.println("使用装饰器后(加密压缩):");
BaseDecorator encryptionDecorator = new EncryptionDecorator(before);
encryptionDecorator.write(data);
System.out.println("只有加密读出的数据为:" + encryptionDecorator.read());
BaseDecorator compressionDecorator = new CompressionDecorator(before);
compressionDecorator.write(data);
System.out.println("只有压缩读出的数据为:" + compressionDecorator.read());
BaseDecorator encryptionAndCompressionDecorator = new CompressionDecorator(new EncryptionDecorator(before));
encryptionAndCompressionDecorator.write(data);
System.out.println("加密压缩读出的数据为:" + encryptionAndCompressionDecorator.read());
}
}
|
输出结果
1
2
3
4
5
6
7
8
9
10
11
12
13
14
15
16
17
18
19
20
21
22
23
24
25
| 字符串:Hello world!
使用装饰器前:
读出的数据为:
[储存的字符串]Hello world!
--------------------- 分割线 ---------------------
使用装饰器后(加密压缩):
只有加密读出的数据为:
(decode)
[储存的字符串](encode)Hello world!(encode)
(decode)
只有压缩读出的数据为:
(decompress)
[储存的字符串](compress)Hello world!(compress)
(decompress)
加密压缩读出的数据为:
(decompress)
(decode)
[储存的字符串](encode)(compress)Hello world!(compress)(encode)
(decode)
(decompress)
|
从结果可以看出加密压缩后字符串变为 (encode)(compress)Hello world!(compress)(encode),然后要先 (decode),再进行 (decompress),才能变为原始字符串 Hello world!。从结果我们可以清楚地看出装饰器的调用顺序是递归栈(先压缩再加密的字符串,需要先解密再解压才能得到原始字符串)。所以,在使用装饰模式时,我们要明确装饰器的调用顺序。
常用场景和解决方案
- 快速动态扩展和撤销一个类的功能场景。
- 可以通过顺序组合包装的方式来附加扩张功能的场景。比如在原始类中加入加解密的装饰器,加解密外层再加入压缩解压缩的装饰器。
- 使用装饰模式可以扩展老旧功能的类,而不改变该类本身。同时新拓展的功能可以任意组合、拆卸。
- 不支持继承扩展类的场景。例如,许多编程语言使用
final 关键字来限制对某个类的进一步扩展。复用最终类已有行为的唯一方法是使用装饰模式:用封装器对其进行封装。
模式的优缺点
| 优点 |
缺点 |
| 你无需创建新子类即可扩展对象的行为。 |
在封装器栈中删除特定封装器比较困难。 |
| 你可以在运行时添加或删除对象的功能。 |
实现行为不受装饰栈顺序影响的装饰比较困难。 |
| 你可以用多个装饰封装对象来组合几种行为。 |
各层的初始化配置代码看上去可能会很糟糕。 |
| 单一职责原则。你可以将实现了许多不同行为的一个大类拆分为多个较小的类。 |
增加问题定位和后期代码维护成本。 |
拓展知识
- 适配器模式侧重于转换,装饰模式侧重于动态扩展。
- 桥接模式侧重于横向宽度的扩展,装饰模式侧重于纵向深度的扩展。
- 一般情况下不建议装饰器超过 10 个,如果超过要考虑重构组件功能。
- 对于没有上下逻辑的装饰器要尽量避免使用装饰模式。
- 装饰模式是一种递归组合的模式。
🔙 设计模式
📌最后:希望本文能够给您提供帮助,文章中有不懂或不正确的地方,请在下方评论区💬留言!
🔗参考文献:
🌐 设计模式 –refactoringguru
▶️ bilibili-趣学设计模式;黄靖锋. –拉勾教育
📖 图解设计模式 /(日)结城浩著;杨文轩译. –北京:人民邮电出版社,2017.1
 微信
微信 支付宝
支付宝